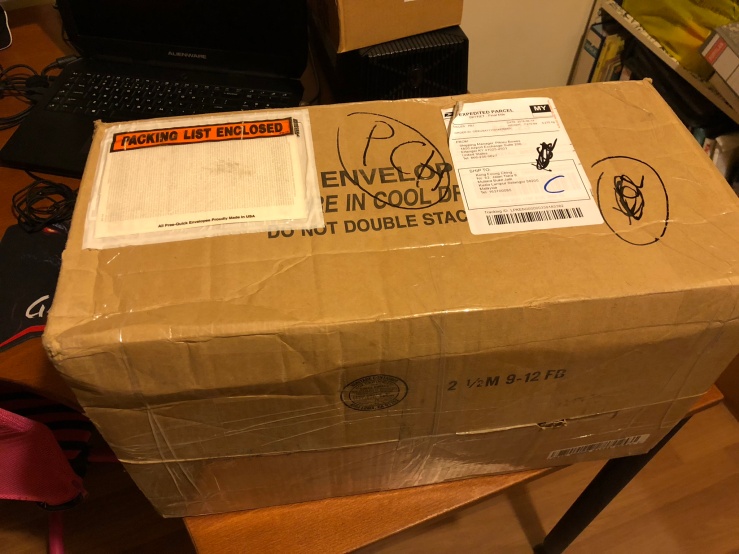
Just a while ago, I’ve snipped 3 sets of dual cpu tray for Mac pro 4,1 and 5,1 from ebay. Took them a couple to 3 weeks to arrived.
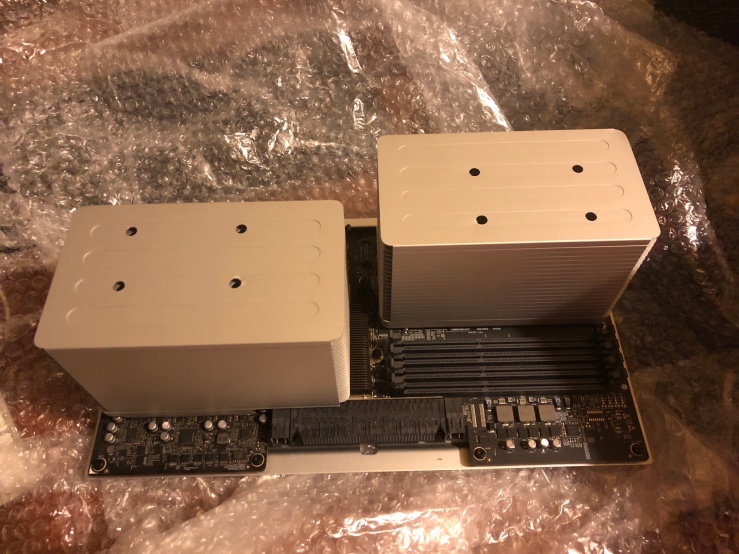
The first tray is for 4,1. I started the first upgrade project to dual cpu with this 4,1 tray. According to informations from other users in forum and reddit, this tray can’t be use in 5,1 machine and vice versa.
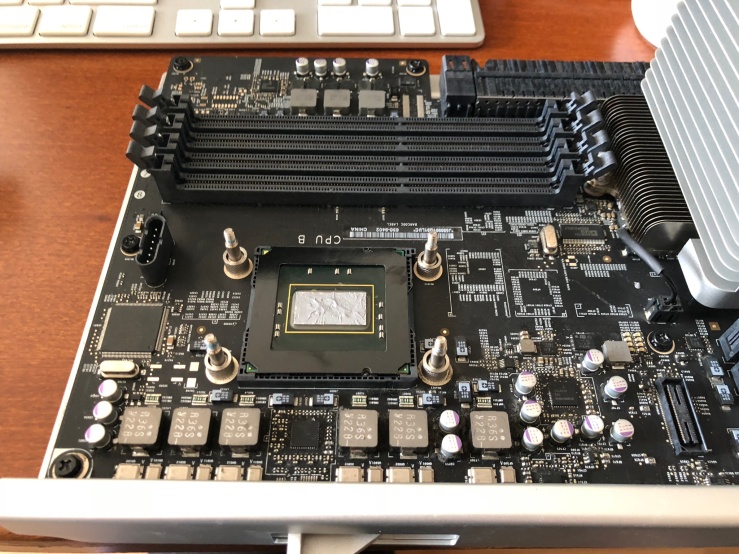
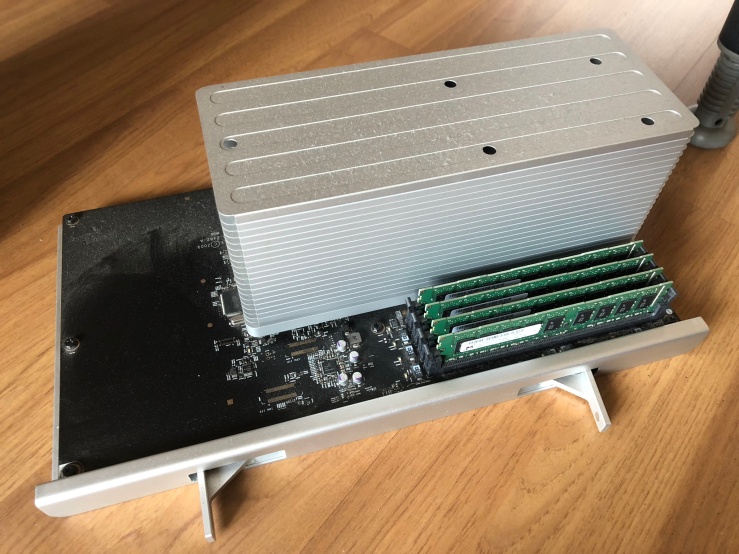
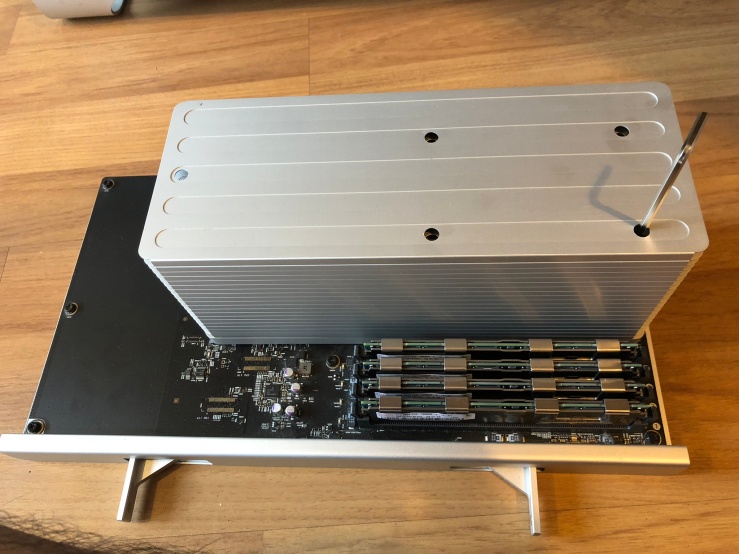
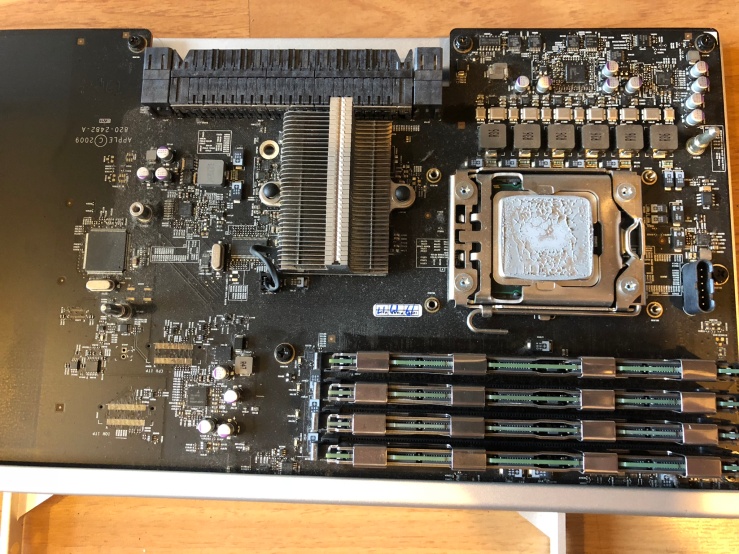
The cpu tray came without ram but it came with two installed cpu. It’s a 2.66GHz Quadcore Intel Xeon.
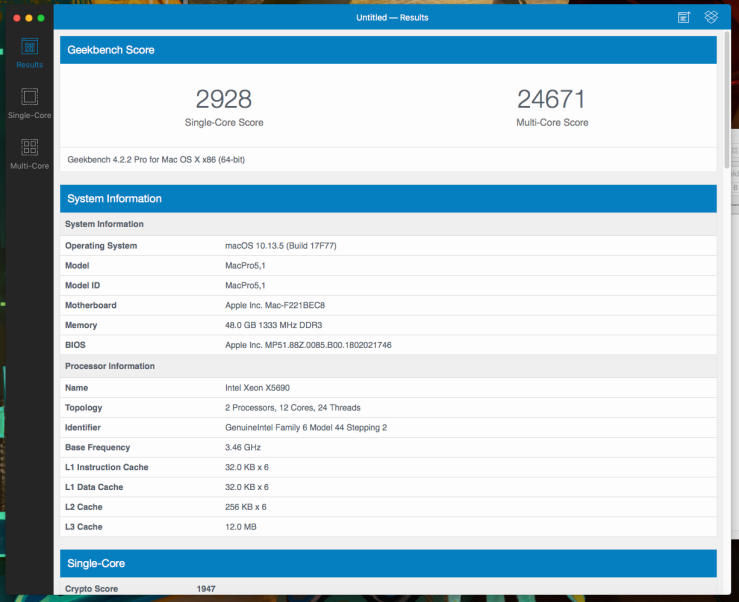
Thrown it to geekbench 4 64 bit and the result seems to be quite close to a 6 core X5690 Xeon for Multi-core. Single core wise the X5690 still better (close to 3,000 for single core).
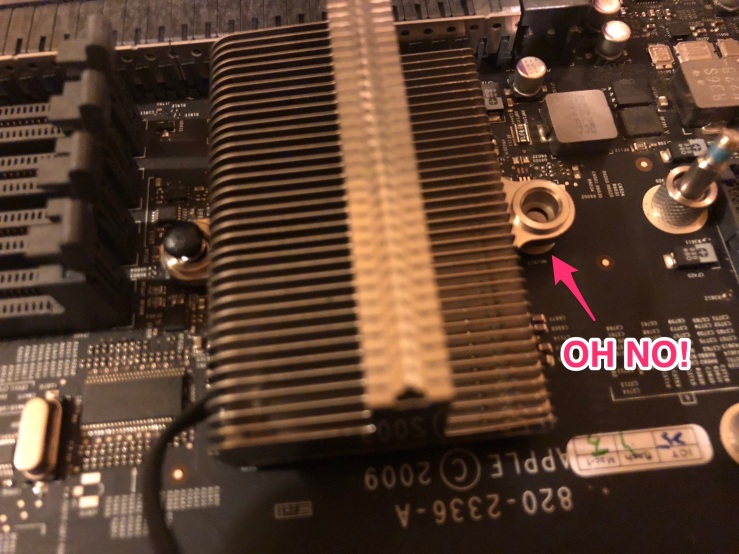
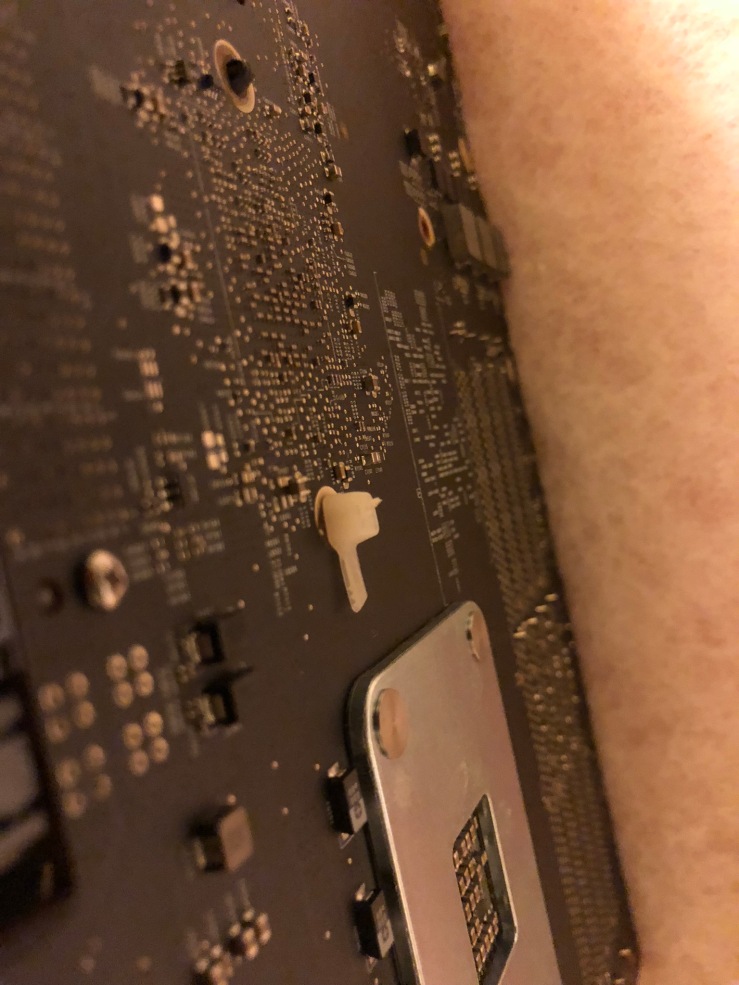
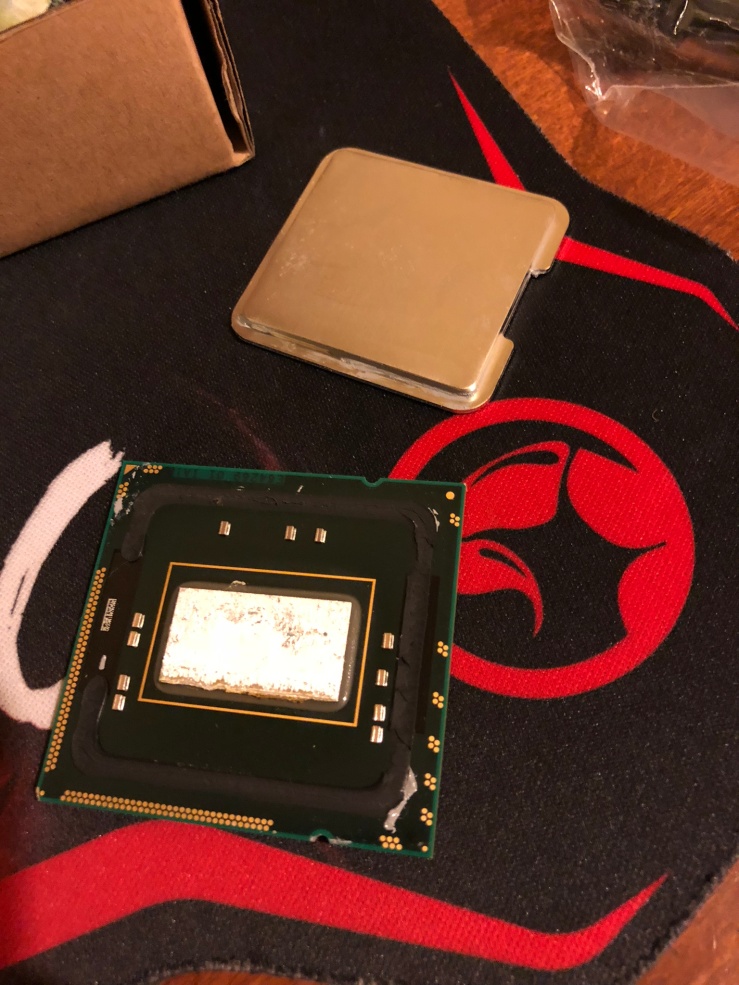
I’ve removed the CPU heat sink and found out that one of the push pin of the north bridge heat sink broken. The system turns out to be very unstable with the lose heat sink. It overheats and freeze after a few minutes.
Here’s how the broken push pin looks like.
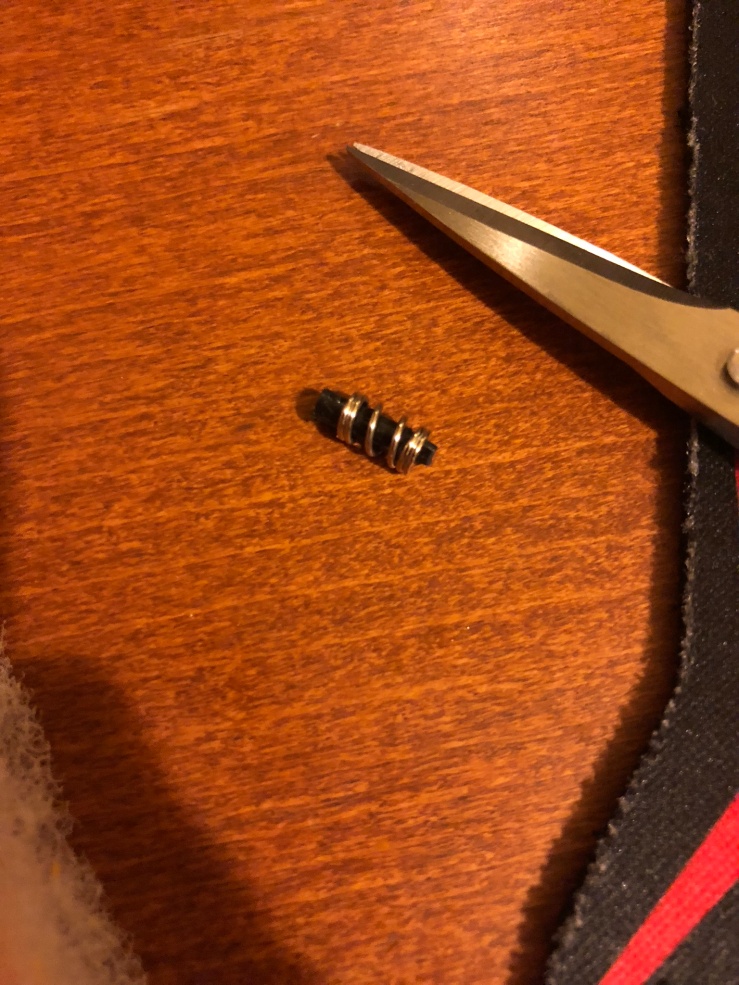
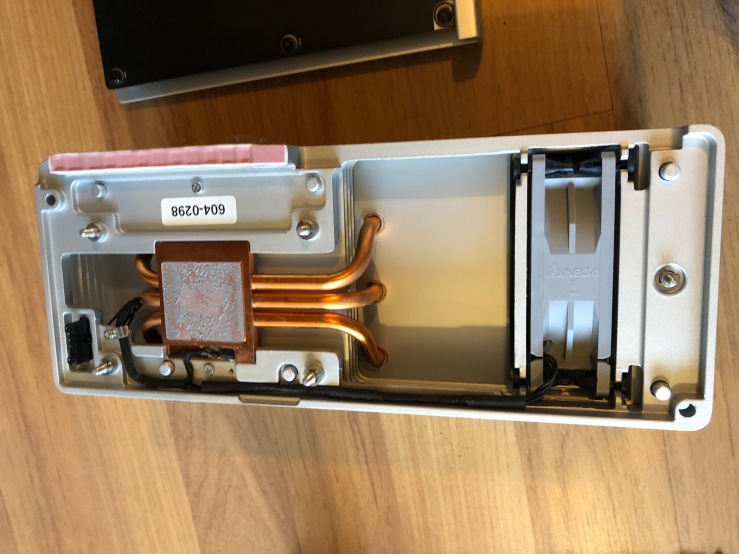
After doing a bit of research, I’ve took the whole motherboard off the tray by unscrewing all of the screw. Removed the northbridge heat sink as well and redo the thermal paste. Then I replaced the push pin with zip ties.
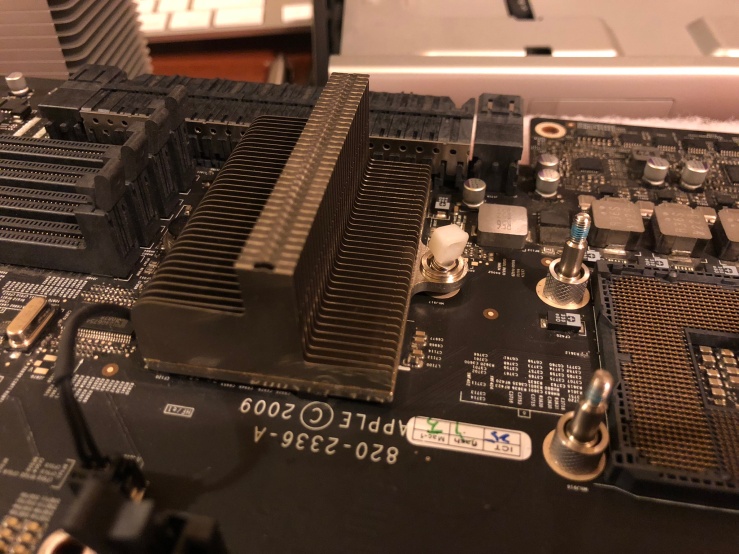
This is how it looks like under the motherboard. The fix seems to work fine.
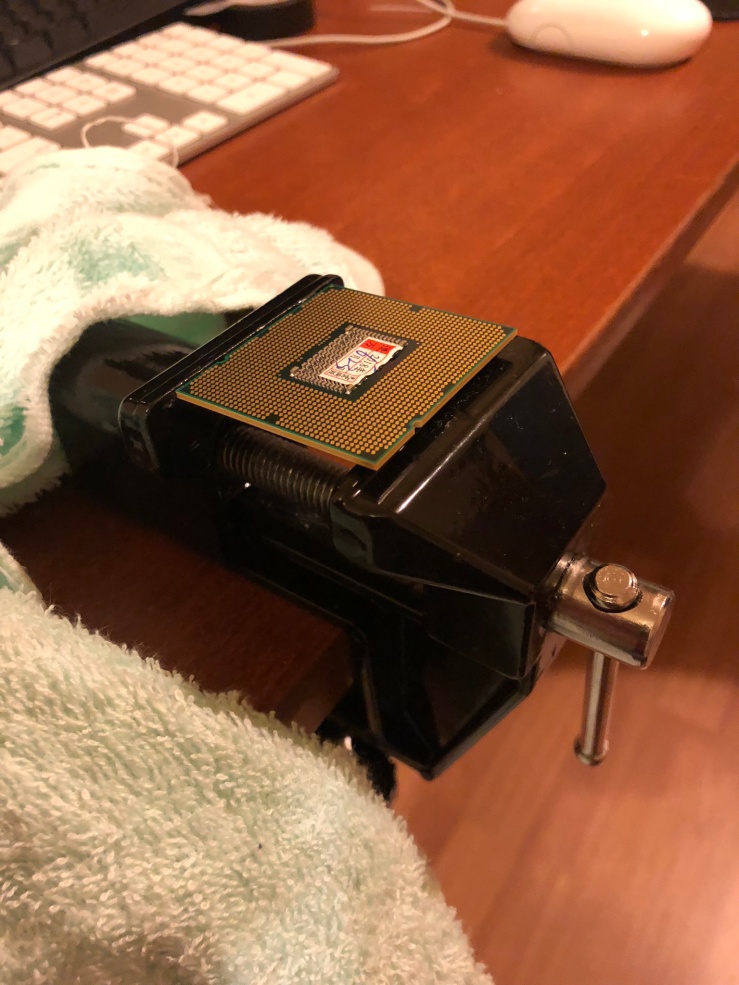
Due to the reason that 4,1 dual cpu are using delidded CPU. I have tried to find way to install the CPU the way it is. Tried using washers and etc but none of the method works. I end up following a youtube video https://www.youtube.com/watch?v=yP8FpwrGeTk
Bought a small vice and tried to remove the lid with brutal force method.
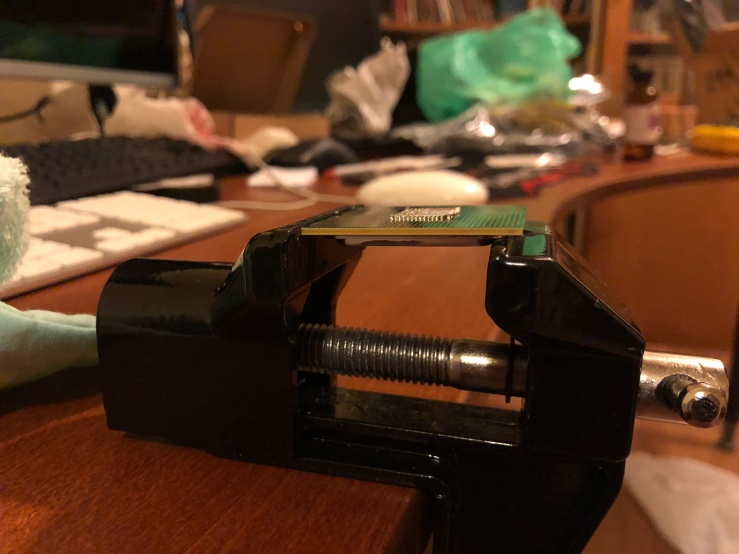
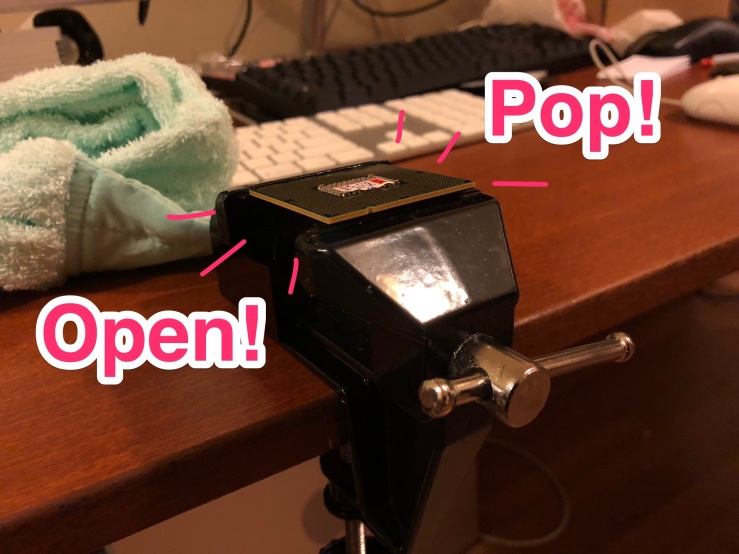
Applied quite a lot of force here. Until I thought I was almost breaking the cpu. My hands hurts like hell.
After close to 30mins of struggling, I’ve finally be able to hear the “Pop” opened sound.
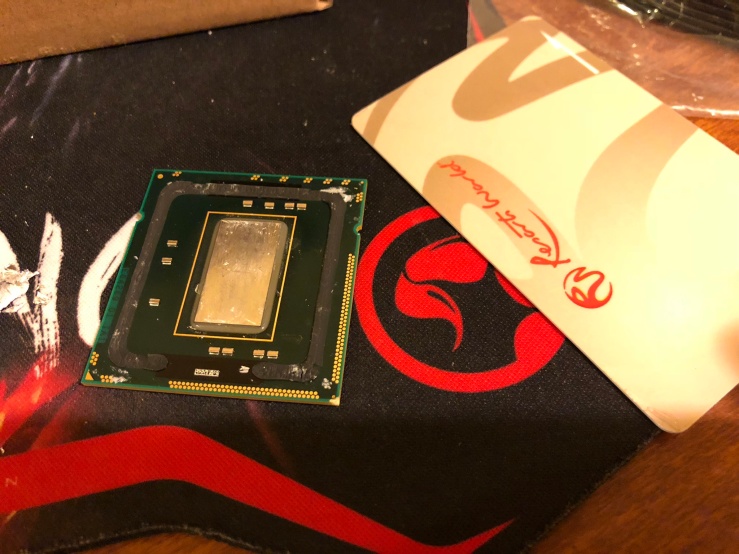
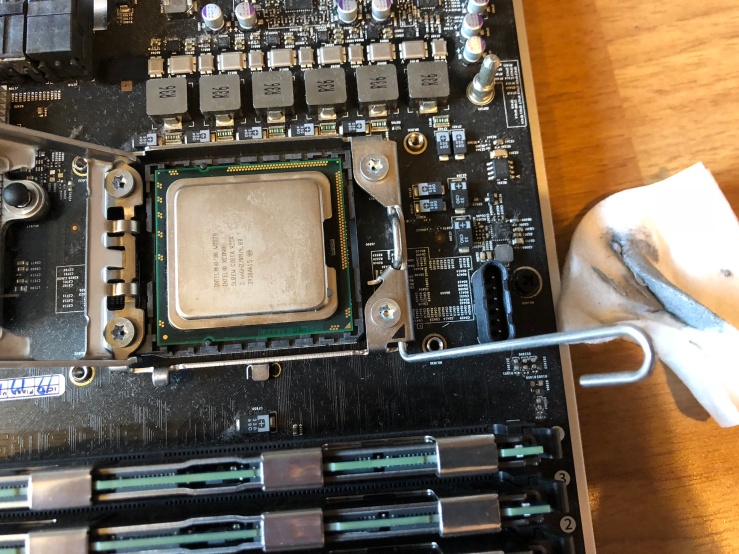
On the cpu, we can still see some remaining solder.
I have to use a membership card to scrub the solders off.
It’s going to work as long as it looks clean enough when you can see the shiny part of the cpu.
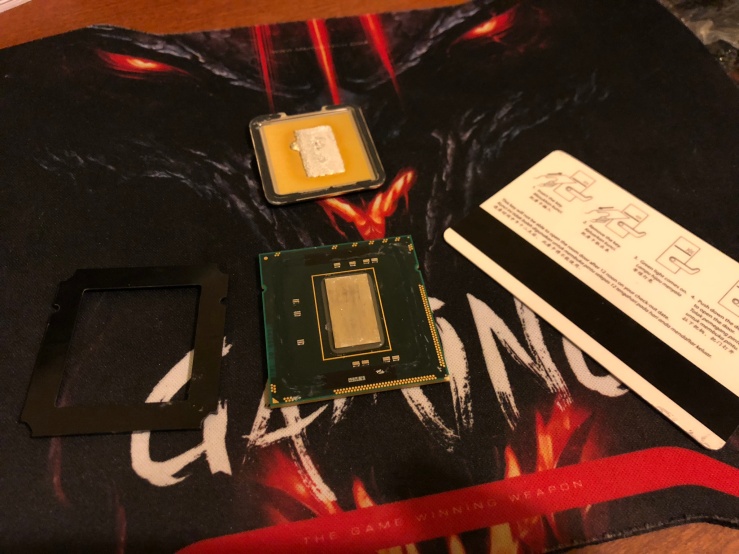
Time for thermal paste.
Using a spreader I’ve spread the thermal paste nicely on top of the cpu. Also I’ve put on the cpu socket bracket came with the cpu tray.
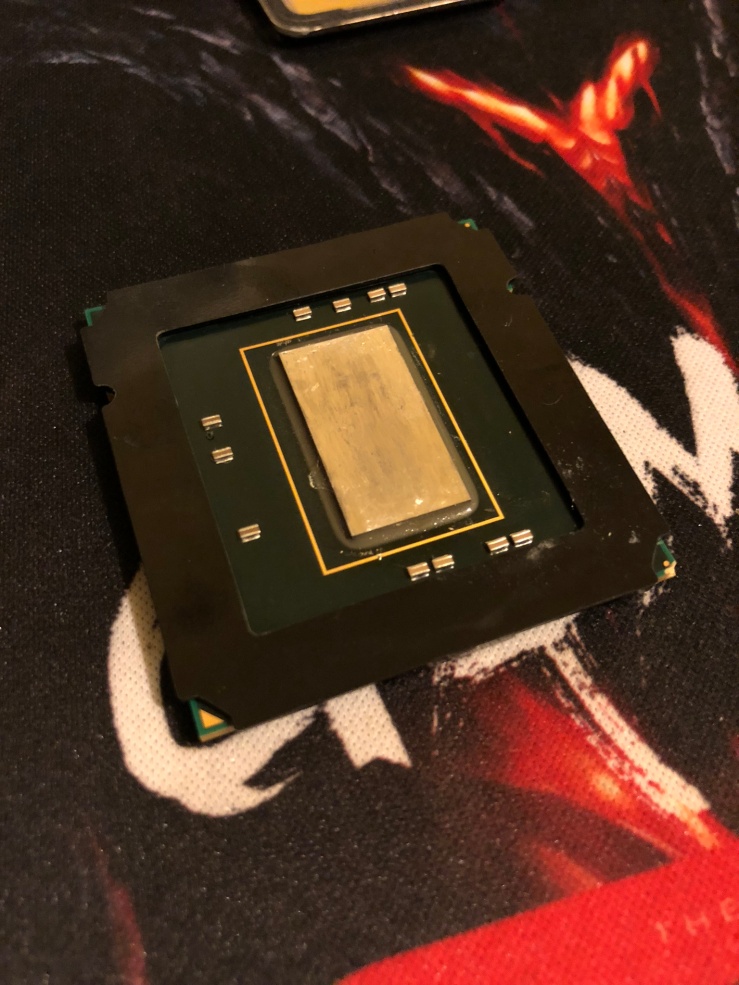
Now it’s time to try to boot it up.
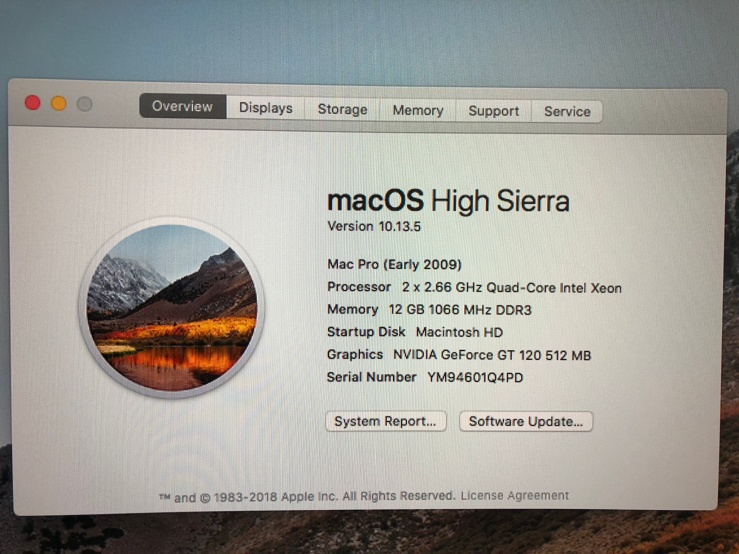
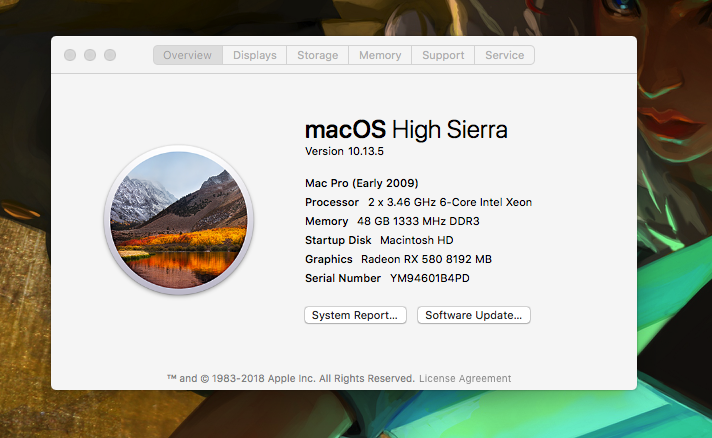
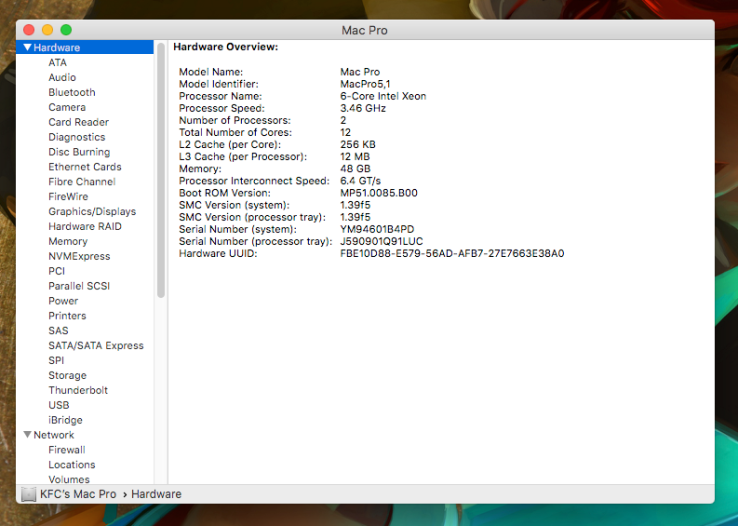
It was recognised as 3.46 GHz 6-Core Intel Xeon immediately. All of the rams are recognised as well. First success for cpu A! Now it’s time for the cpu B.
For the next cpu, I have put the cpu tightened on the vice the same way like the first time. But due to the time restrictions I’ve left it over night and going to try yanking it the next day. Surprisingly, the lid came off in 10 seconds when I make the first twist. Seems like leaving the cpu on the vice overnight is the best and easiest way to delid the cpu.
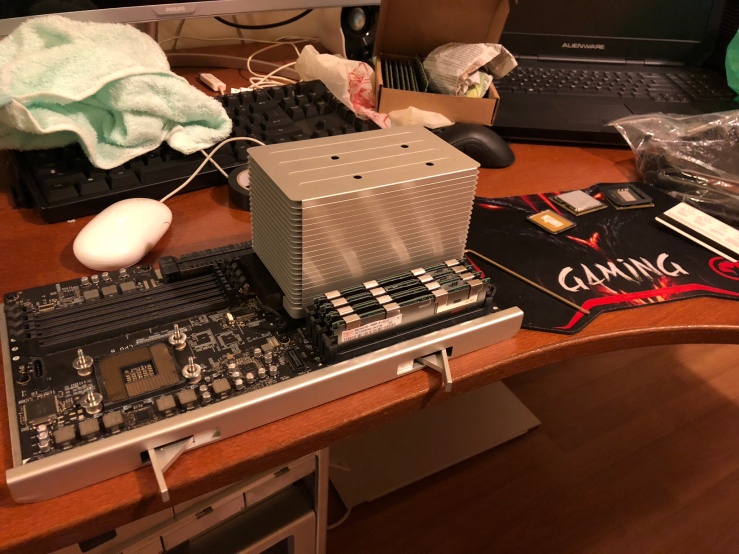
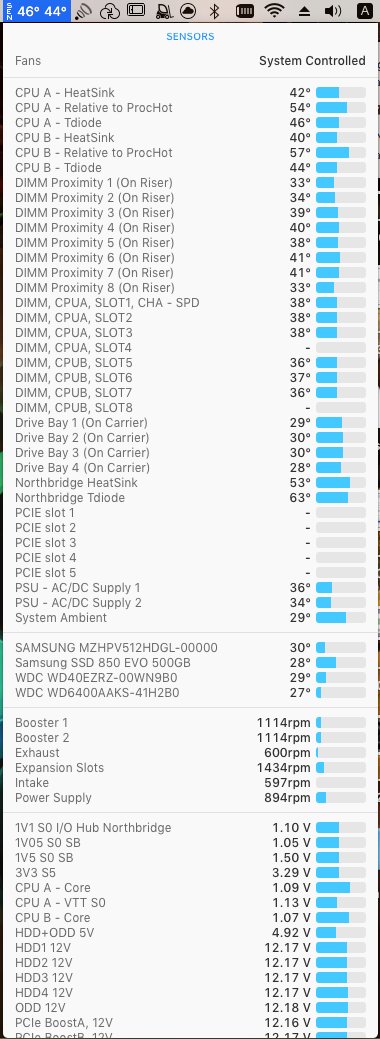
Finally I’ve got all 2 cpu in my system. CPU temperature and Northbridge all seems good enough.
Here’s all 24 of the threads of the CPU with hyperthreading.
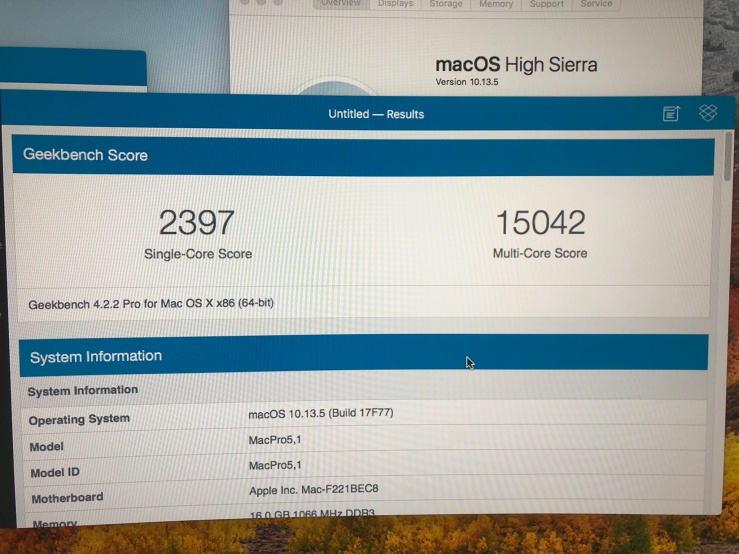
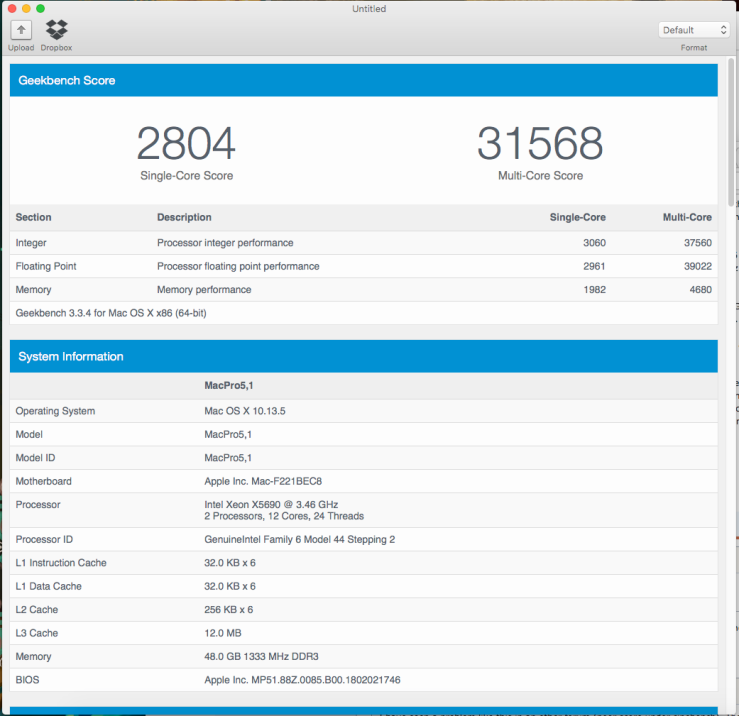
Here’s the Geekbench 4 64bit score.
And here’s the Geekbench 3 64bit score.
It was a fun project. Love the final result.
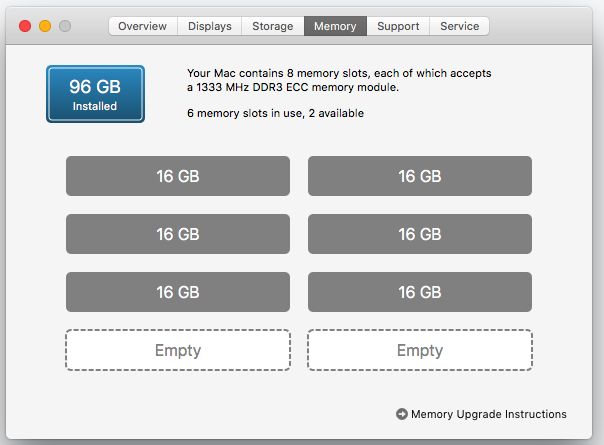
2 weeks later, my 16Gig ram sticks arrived.
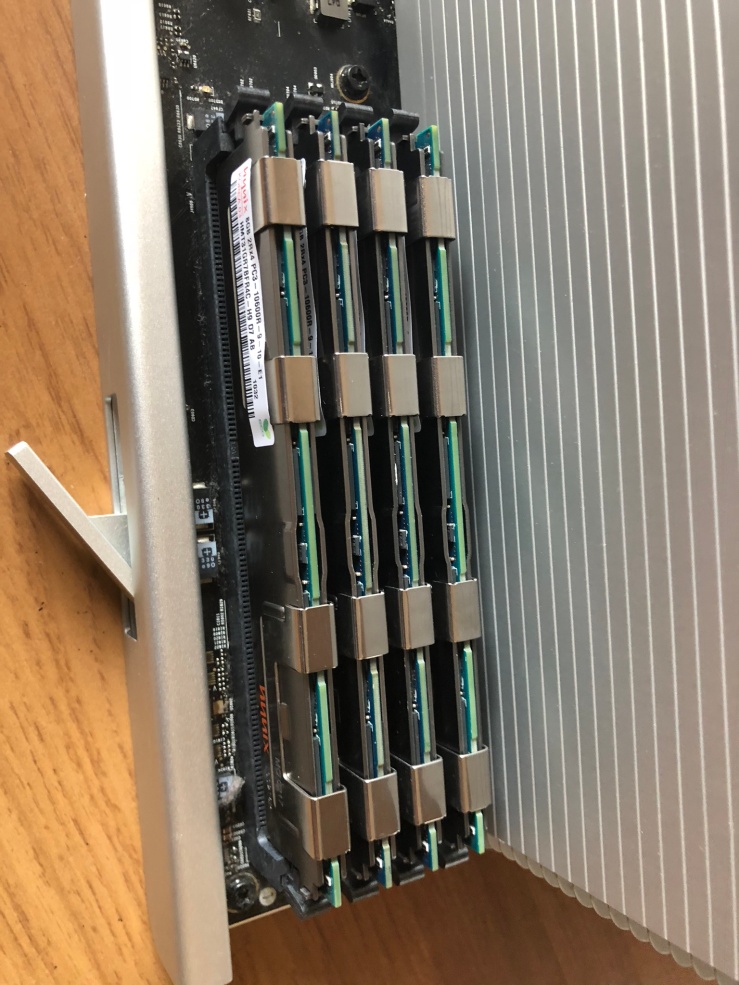
I’ve put 3 rams on each side of the CPU. So it’s running full speed in tripple channel at the moment.
Very happy with the system now. The FCP video editing and render speed are very close to the results of an iMac Pro (entry spec).
I’ve paid RM 1,500 in total including of shipping for each of the CPU tray.
The 5,1 cpu tray came with 12 core X5650 which I can recycle for my other x58 based windows PC for overclocking project.
Ever since the weakening of Ringgit (Malaysia), buying a new Apple Computer in Malaysia is a really difficult thing to do when we used to be able to buy a Mac pro for just over RM10,000 but now we have to fork out more than RM 18,000 just to get an similar spec system.
I’ve tried Hackintosh a few years ago but I knew it’s not going to be the same no matter how we do it.
My career kinda rely on Mac exclusively (Xcode, Final Cut Pro X, Motion and etc).
Just a couple of months ago, I have found a post in lowyat.net forum for some Mac Pro 4,1 and 5,1 for sale. The pricing that the seller posted is very reasonable.
Mac Pro 4,1 = RM 1,300 Each (USD 319)
Mac Pro 5,1 = RM 1,600 Each (USD 393)
Saw this video online for an upgraded Mac Pro. Kinda made me decided to buy a couple of these for experiment.
I knew I have to definitely get it and give it a go.
Always thought of getting a used G5 and mod it to a modern hackintosh. But due to the reason that I prefer not to fiddle with too much of hackintosh issues (drivers, hacks and updates issues….) and prefer to stick with genuine Apple Hardware.
Contacted the seller and bought 2 units for 4,1 and 5,1 each.
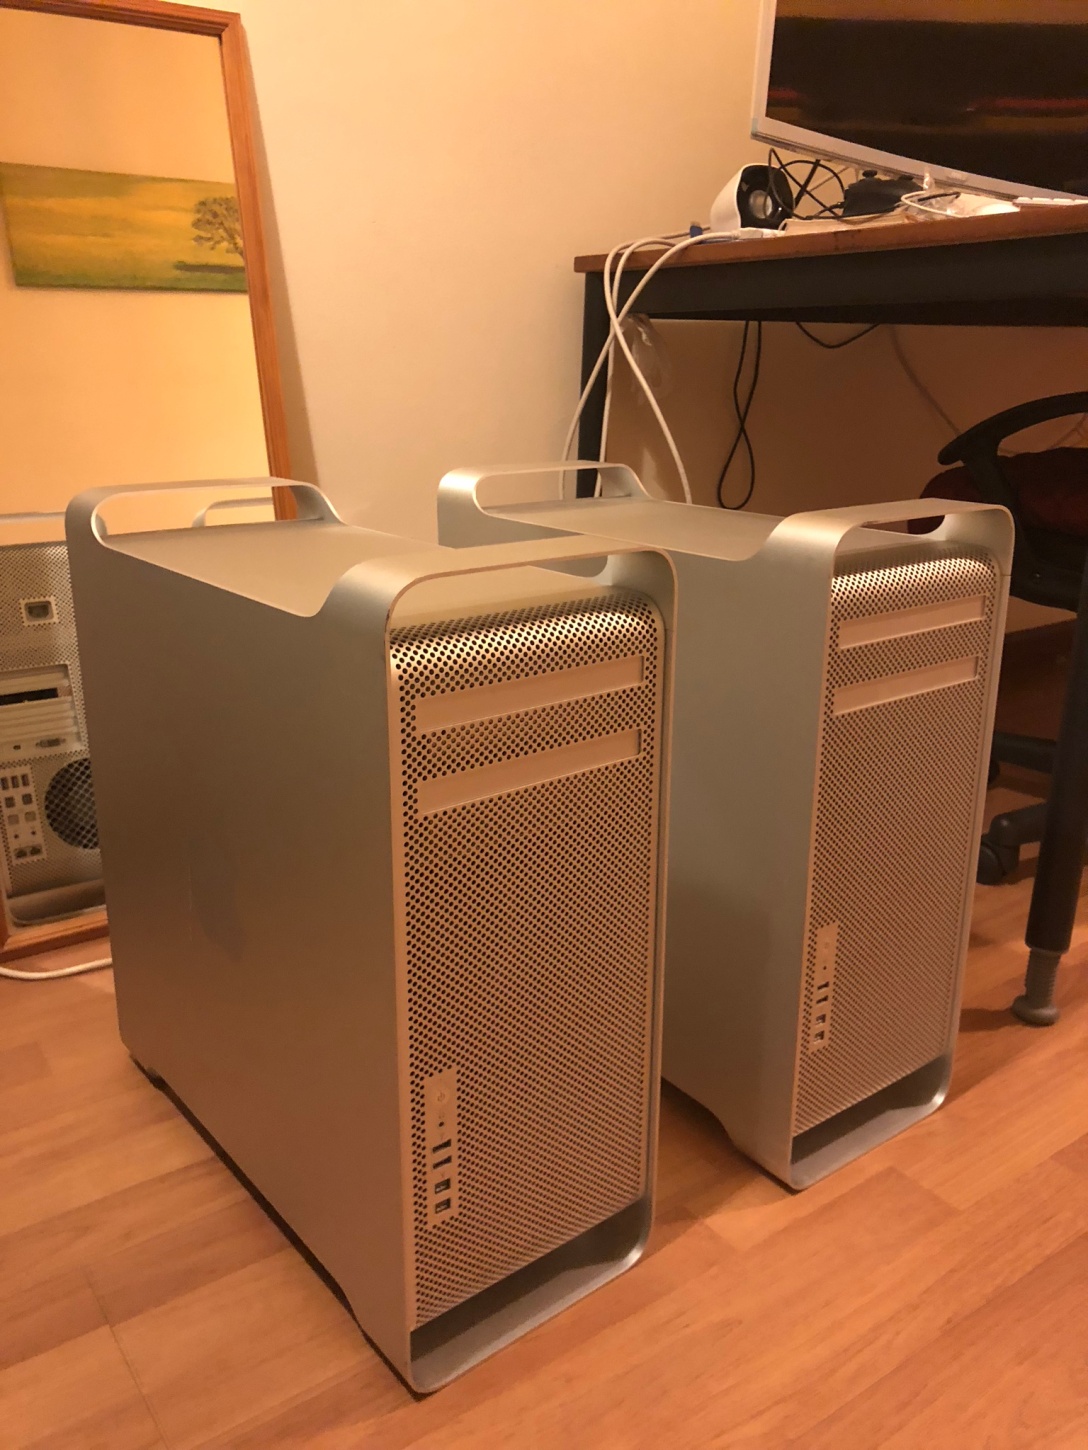
2 of these units came in mint condition. Not much visible cosmetic wear except some small scuff at certain part of the corner. Don’t think it’s a huge problem as my main concern is how it perform. Each set of these came with very hard to find Apple wire keyboard and mouse.
The process isn’t hard. It not the most pleasant experience due to the reason that the machine I’ve bought came with El Capitan which has got an older Safari. For a while I was stuck there because the Safari can’t allow me to download the needed firmware files. Then I figured out that I just need to install the latest Firefox and then I can download the firmwares. As for the rest of the process it was a breeze.
CPU Upgrade
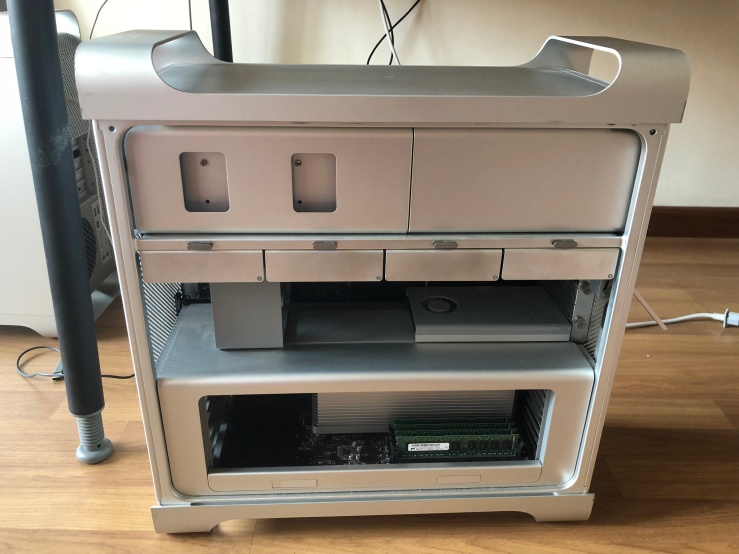
Open up the side panel by just flicking the latch at the back. No screws required, such a well thought and elegant design. The internal seems relatively clean with minor dust in it. I believe the former life of this machine was lightly used and has not need abused before.
The CPU tray seems to comes with 4 pieces of 2GB ram. A little dusty on top but it’s not serious as seen on photo.
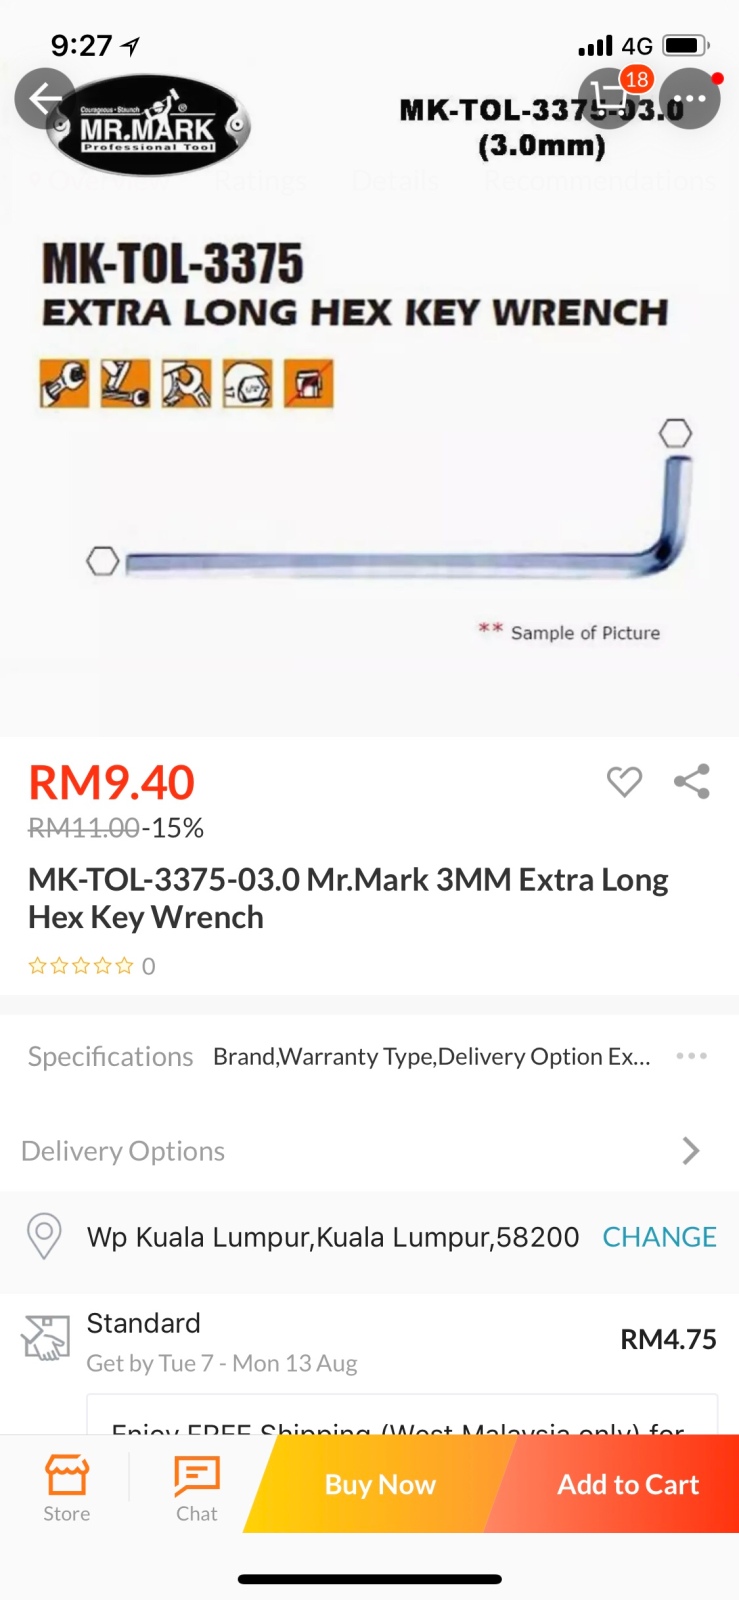
Unscrewing with the hex 3.0mm extra long key wrench. Bought it cheap from Lazada.
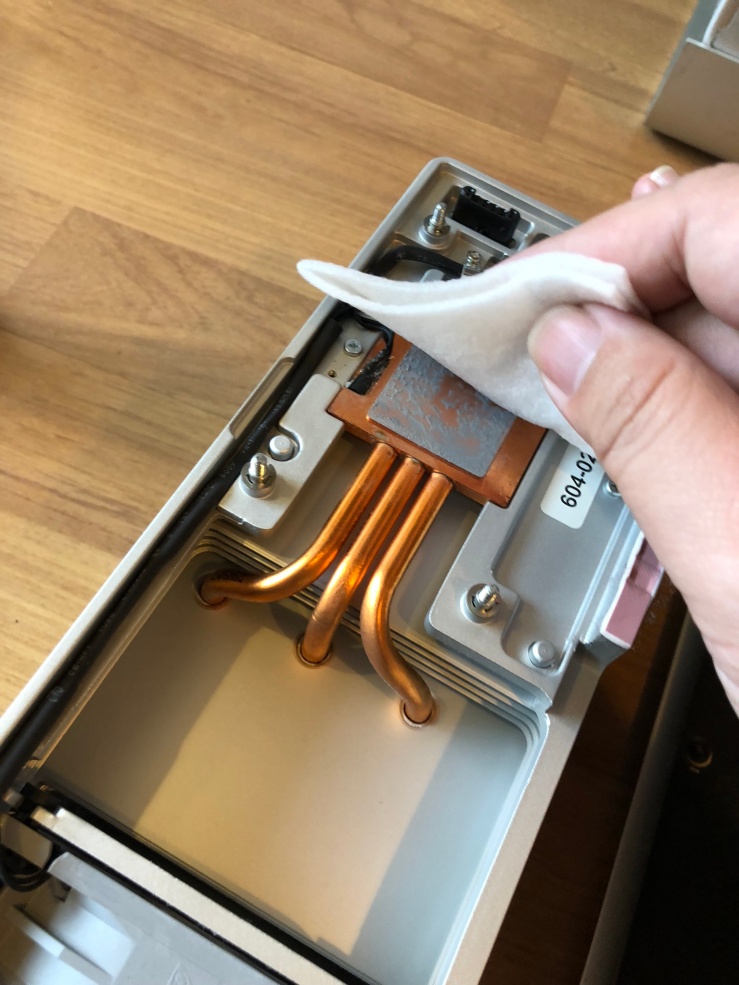
The thermal paste went dry and needed some cleaning with alcohol.
Same goes with the heat sink.
After some cleaning and it’s time to remove and exchange for a better CPU.
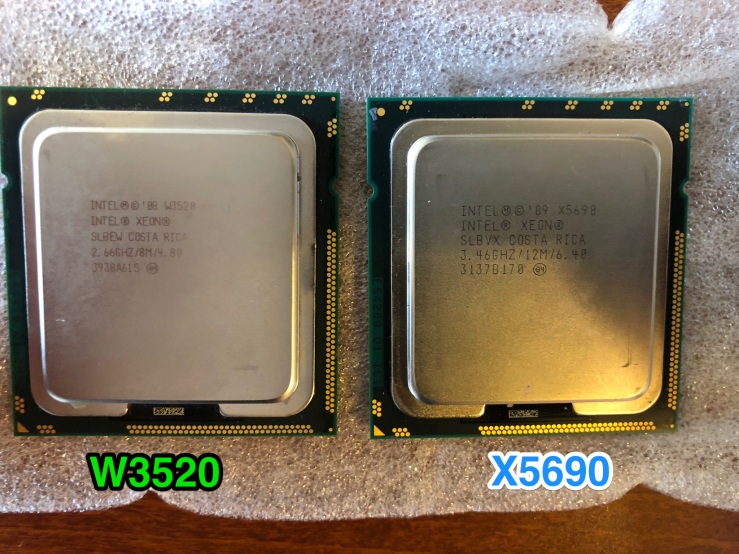
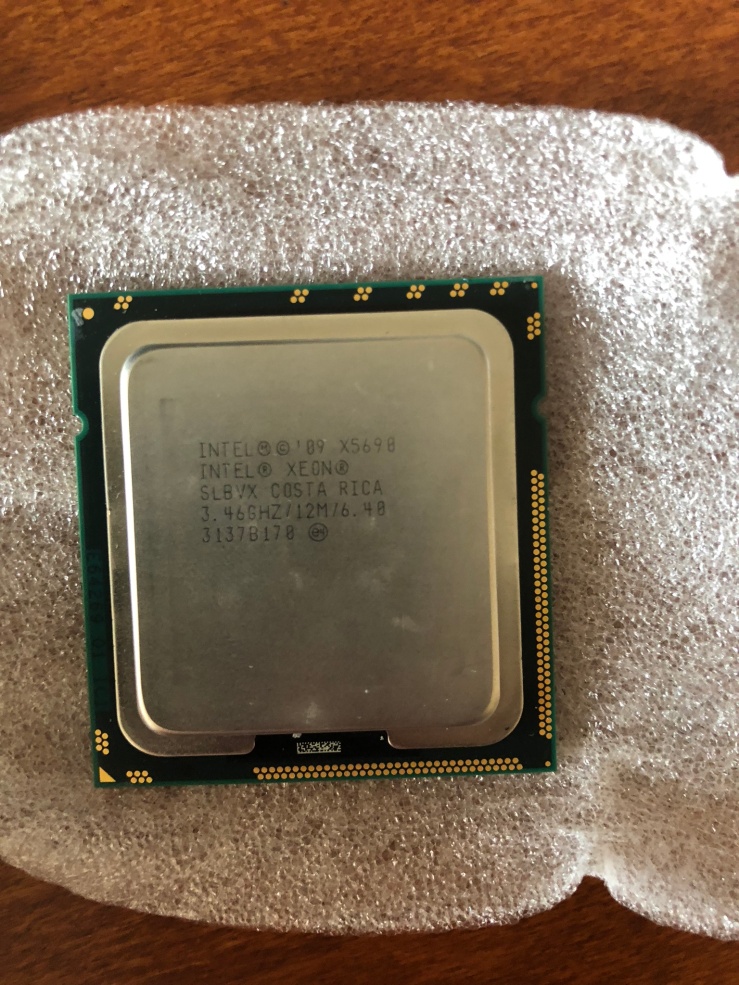
Here’s the comparison of the old included Xeon W3520 and Xeon X5690. Went with this because we can’t easily overclock a Mac Pro and the price for each X5690 went down to about RM320 each.
I was told not to remove the sticker below the chip as it won’t interfere with the performance. I left it there anyway. No harm to the performance so far.
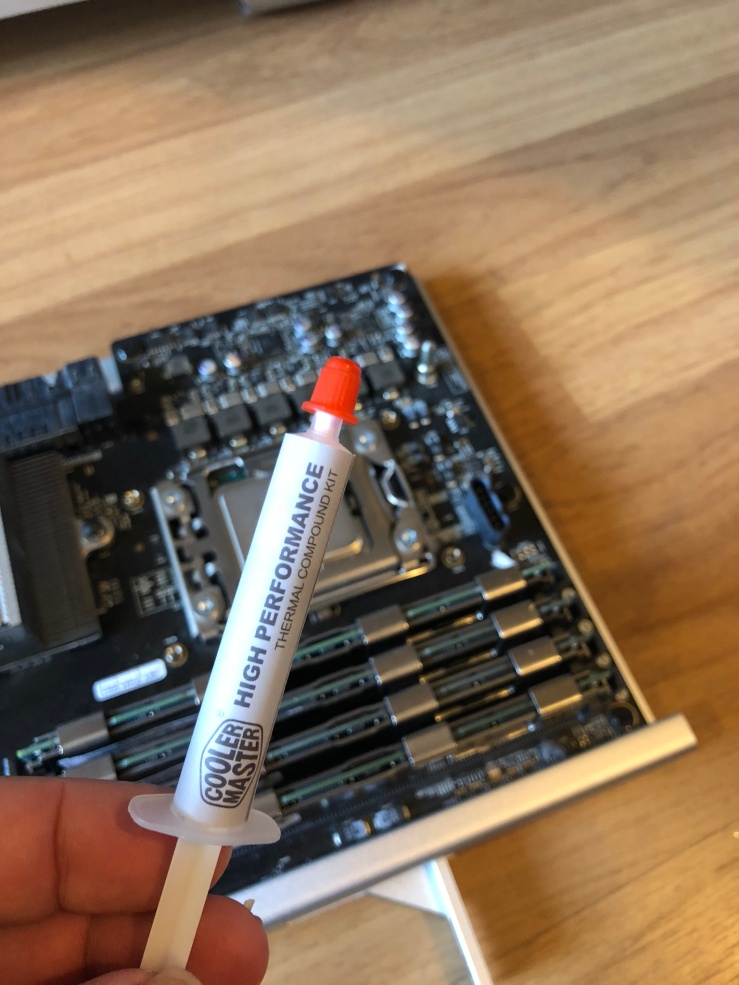
The first time I did this I was using a cheap thermal compound from cooler master that cost around RM12. And after a while I realised that the thermal seems a little higher than expected.
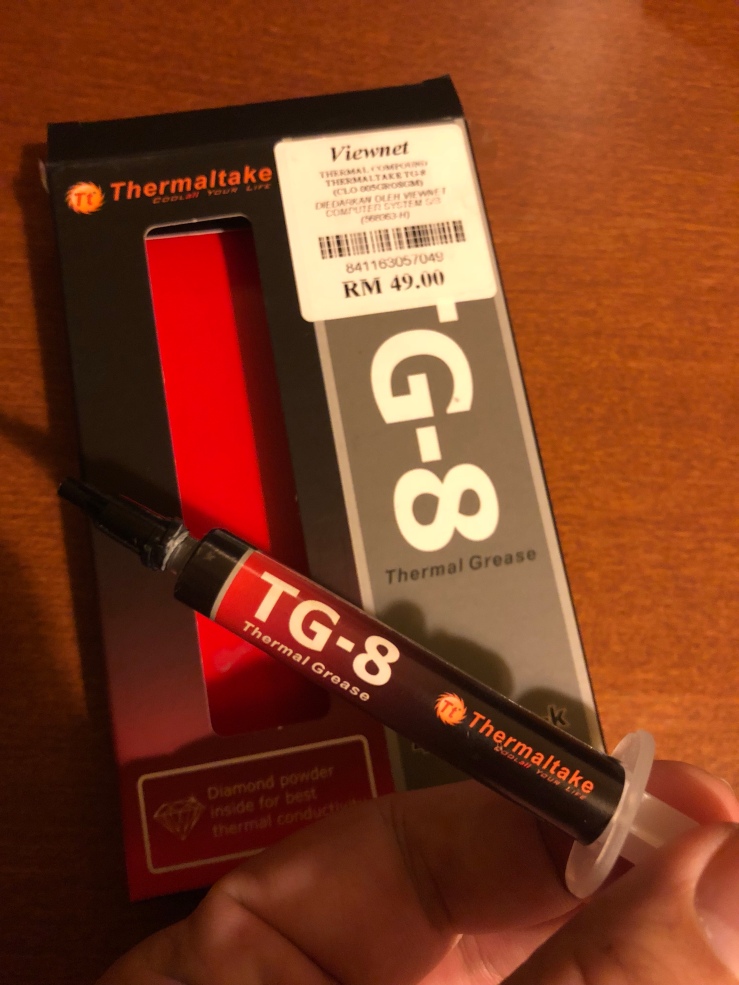
I can’t be able to find ArticSilver 5 in Lowyat. End up buying Thermaltake TG-8 which I can’t be able to find any review online. Any how it’s price RM49 and luckily it’s thermal result is quite satisfying so far.
Before I apply the thermal paste I have to remove the old compound on the heat sink.
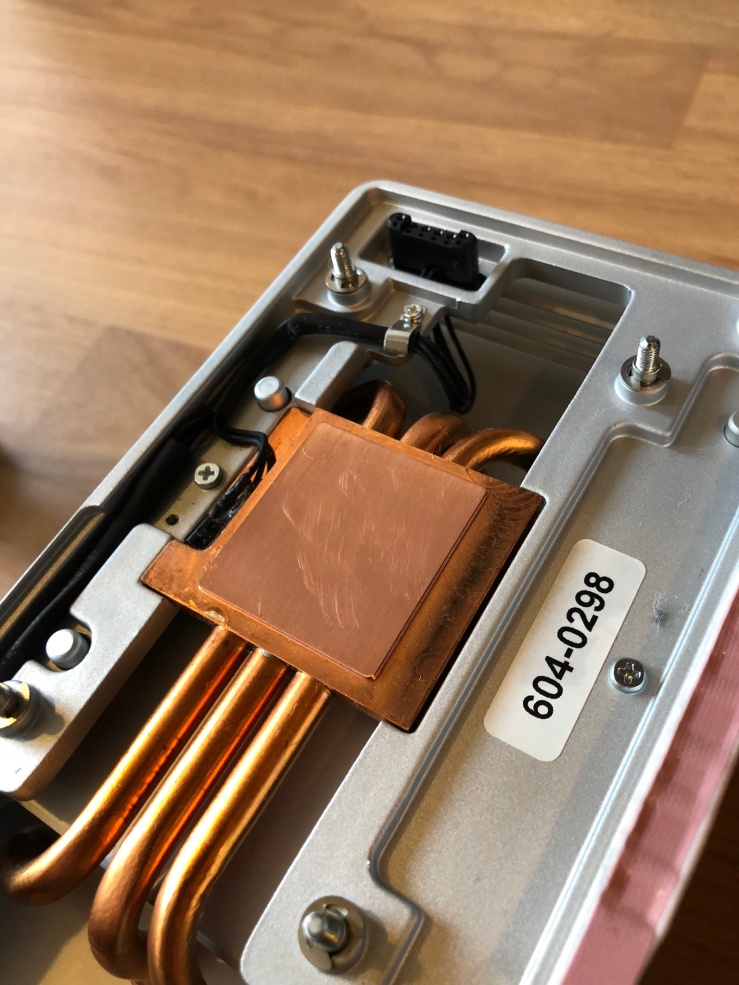
Look shiny and clean and it’s time to apply the paste.
Then I just screw the heat sink back and call it done for the CPU. It’s a single processor Mac Pro 4,1. Still quite easy for the whole process. Dual processor 4,1 is another beast which I will cover in future. 5,1 single and 5,1 dual are relatively easy compared to 4,1 dual cpu.
Also can refer to the video below.
Ram Upgrade
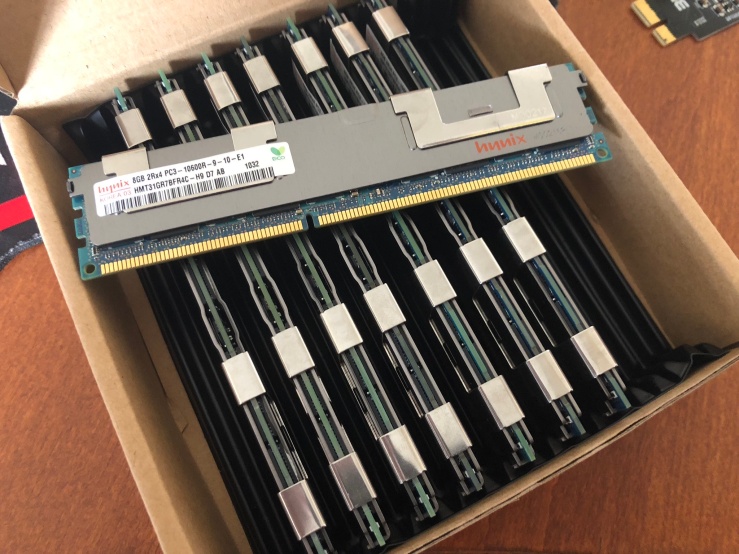
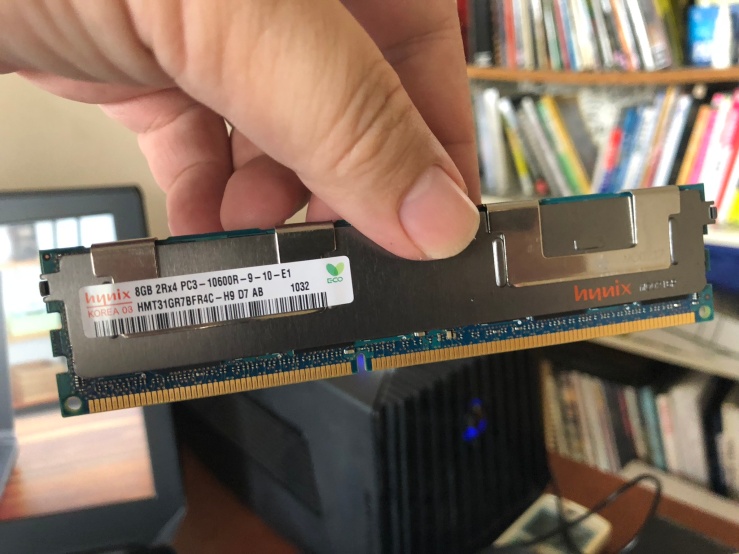
Now check out the Rams I’ve ordered PCL-10600R ECC registered. One thing I have to mention about these Xeon CPU and ECC rams is that they are decommissioned from their existing data Center and plenty of these are flooding to market. If you wanted to upgrade your Mac Pro or any of the X58 based PC. It’s the best time. It yield the best performance even compared to chip in 2018.
Despite of the rams are e-waste from data Center it still looks very new.
I put all 4 of these in to the ram slots of the CPU tray. Very easy.
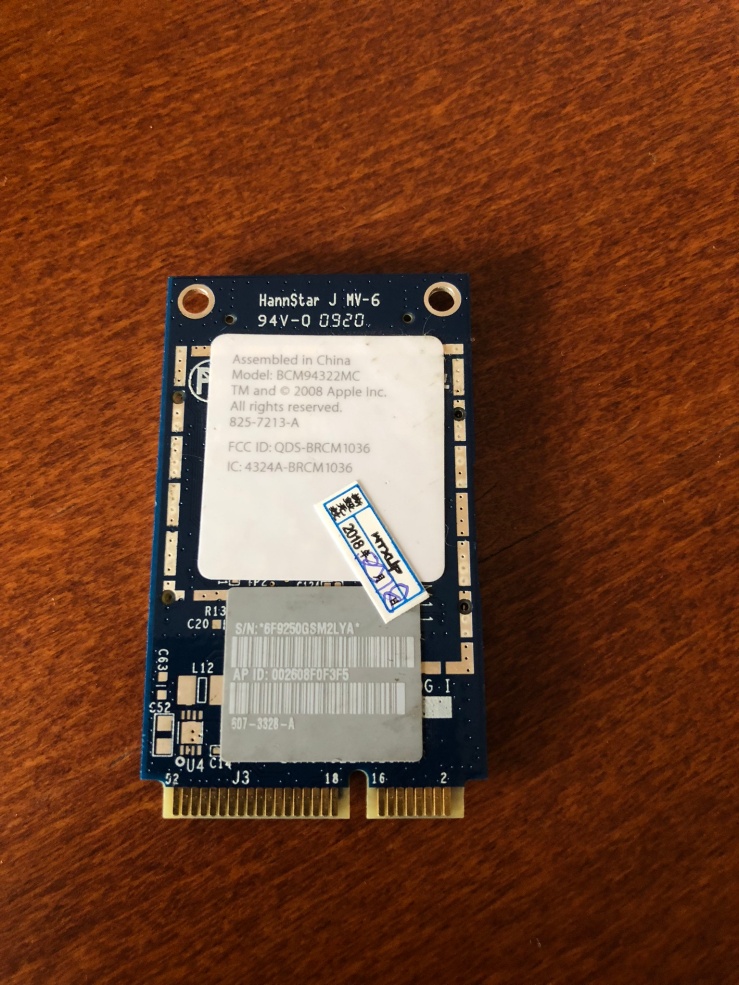
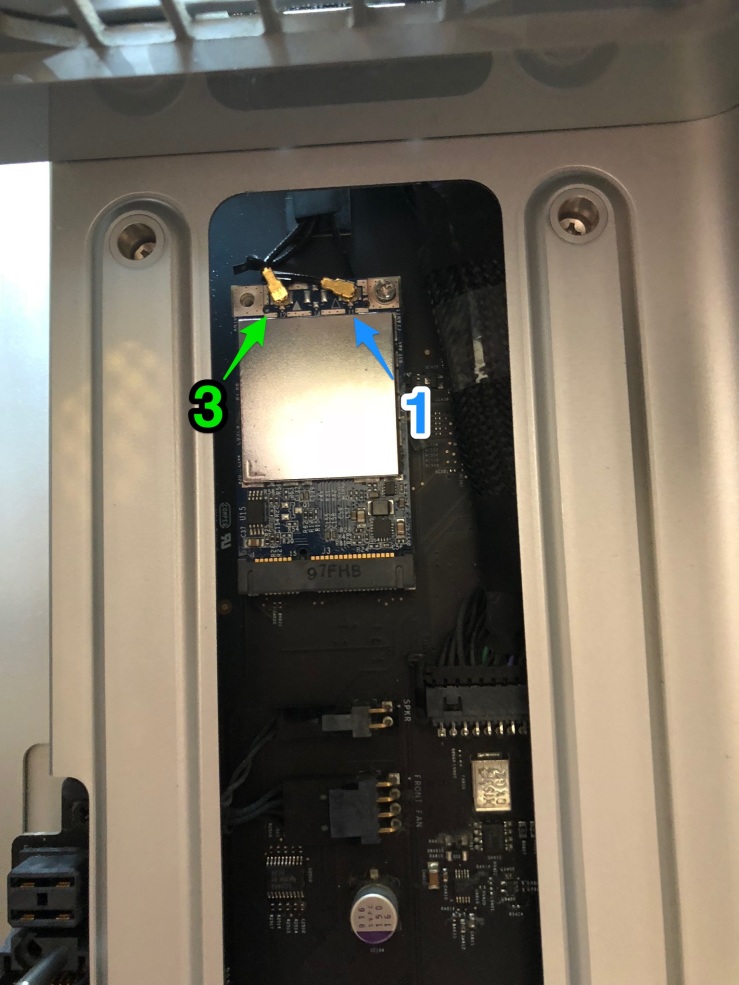
AirPort Extreme Chip
The 4,1 Mac Pro that I bought came without a Wi-Fi chip. Bought this from online from Taobao. It’s the original AirPort Extreme chip which can be installed and recognised directly my OSX.
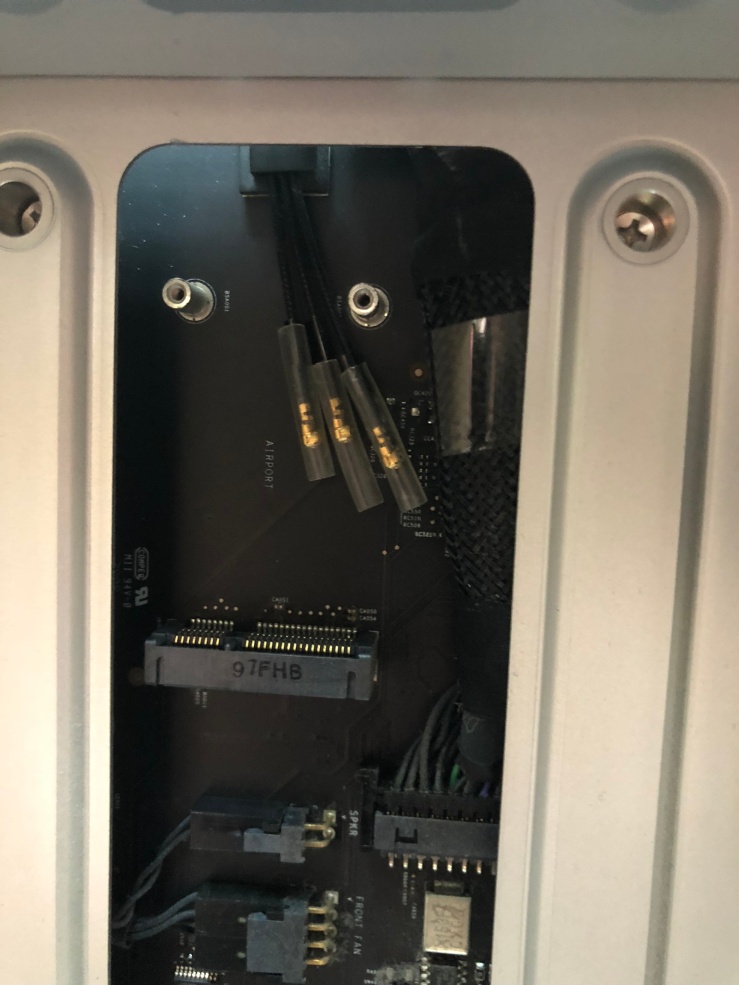
There are 3 cables inside dangling in the case. It can only be seen with the cpu tray removed.
Just connect the cables (check it’s numbered label) according to the numbers I’ve shown in the photo.
Once I’ve done this, I just slot the CPU tray back to Mac Pro
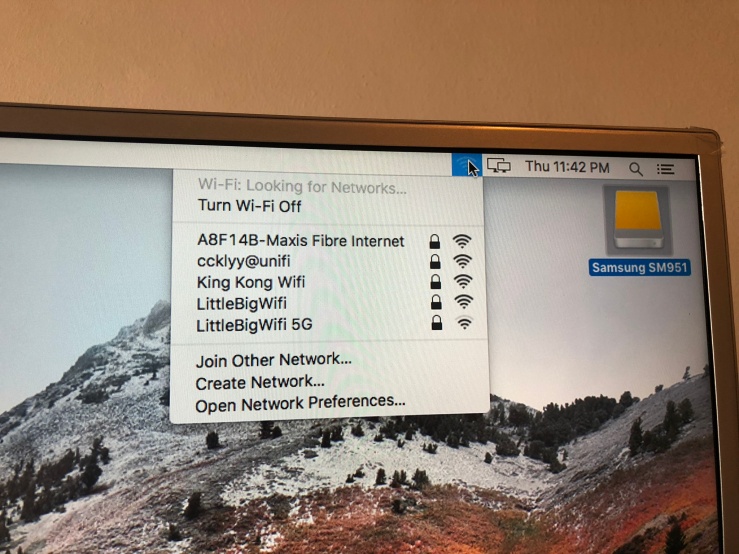
Boot up the system and you will see the Wi-Fi recognised immediately.
SSD Upgrade
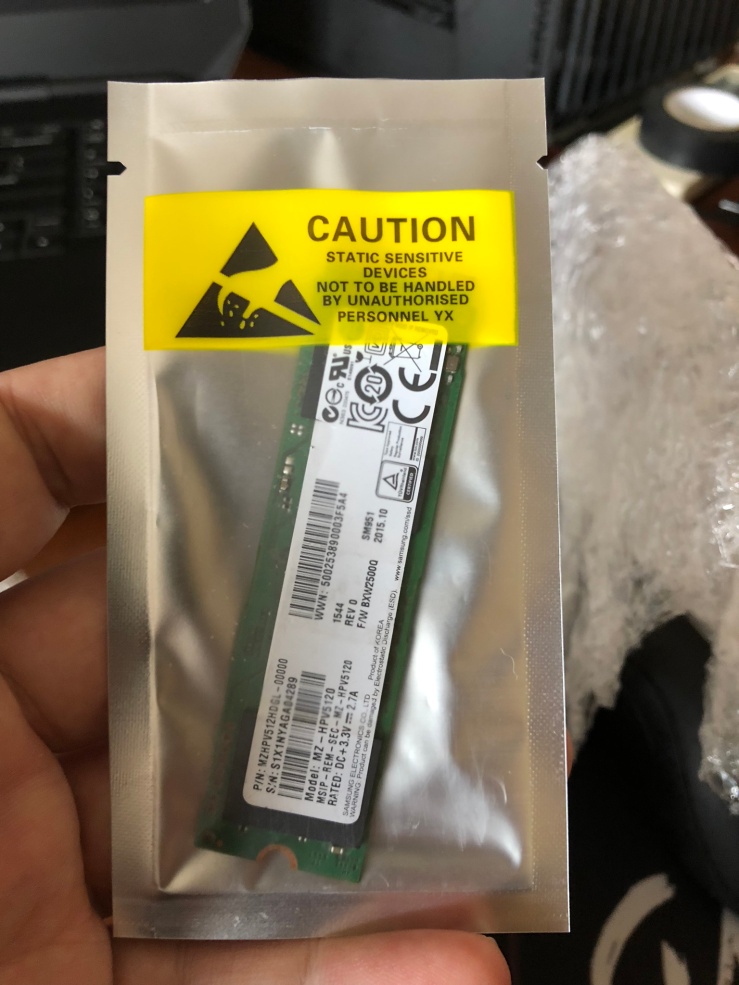
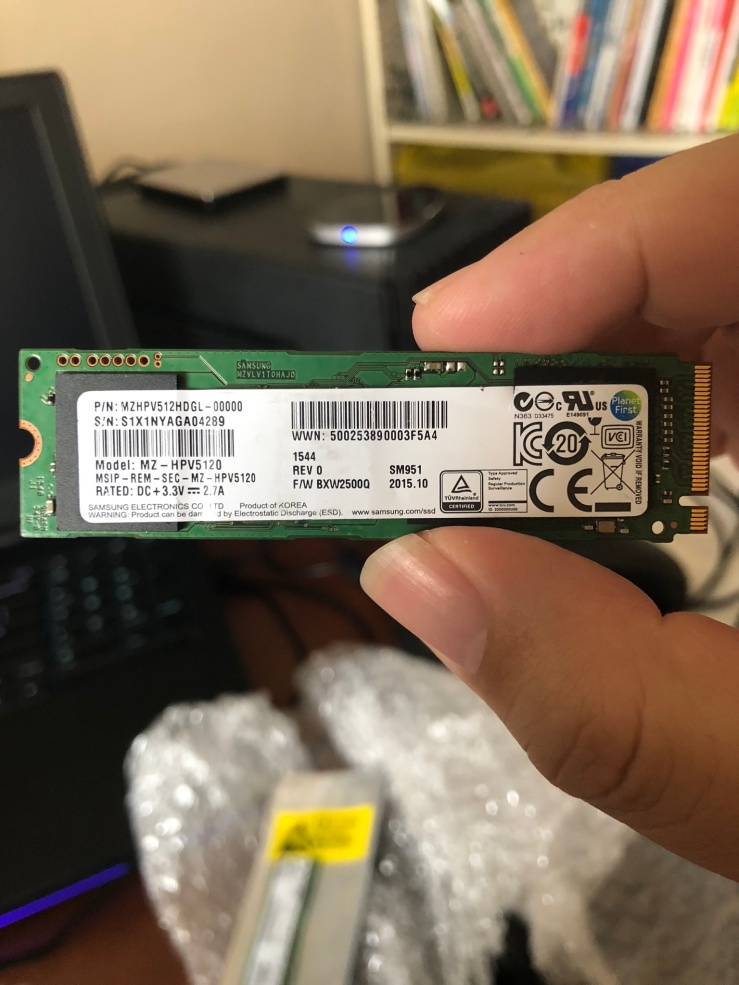
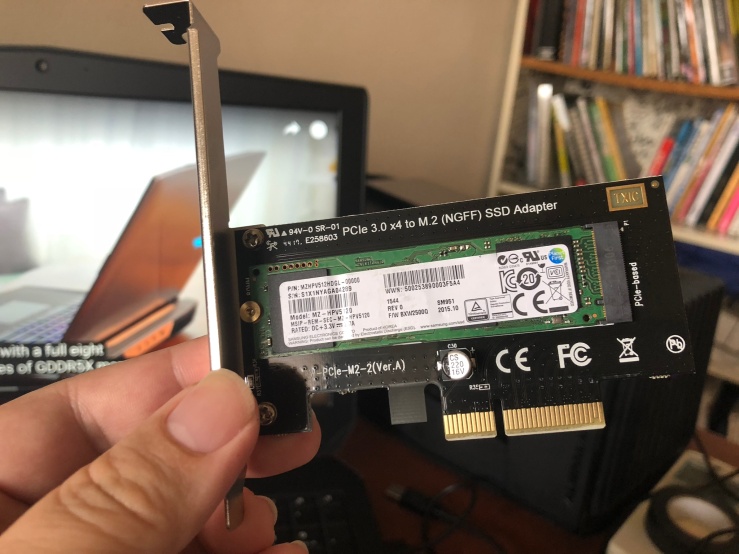
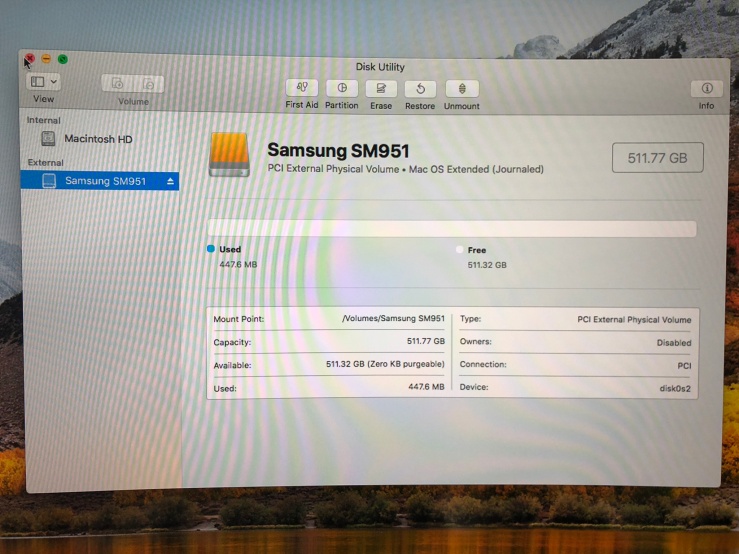
I bought the Samsung SM951 M.2 ACHI SSD from Taobao. Please make sure that it’s the ACHI version so that the Mac OSX can be bootable.
Make sure that you put it in slot 1 or 2 with Pcie 2.0 x16 to maximise its read and write speed.
The one I got here is a 512GB version. Pretty hard to find.
I also need to use a M.2 card for PCIE. It recognised by Mac Pro without any driver issue.
Here’s a tip to clone the Mac OSX from your HDD to SSD.
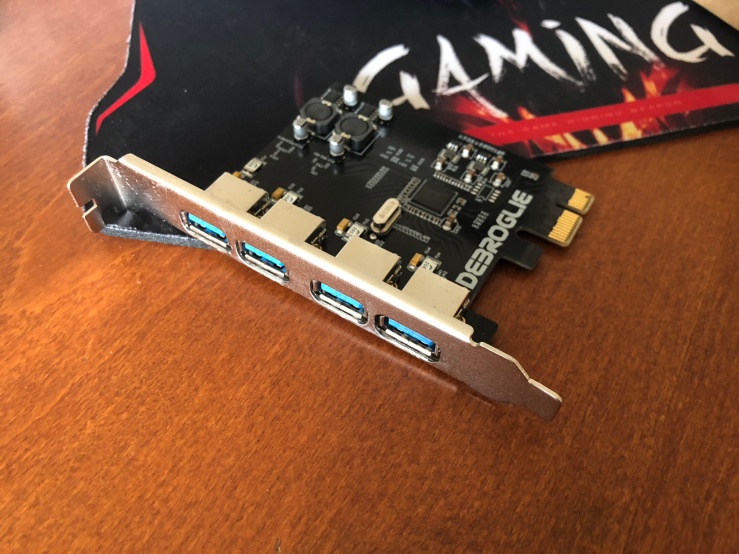
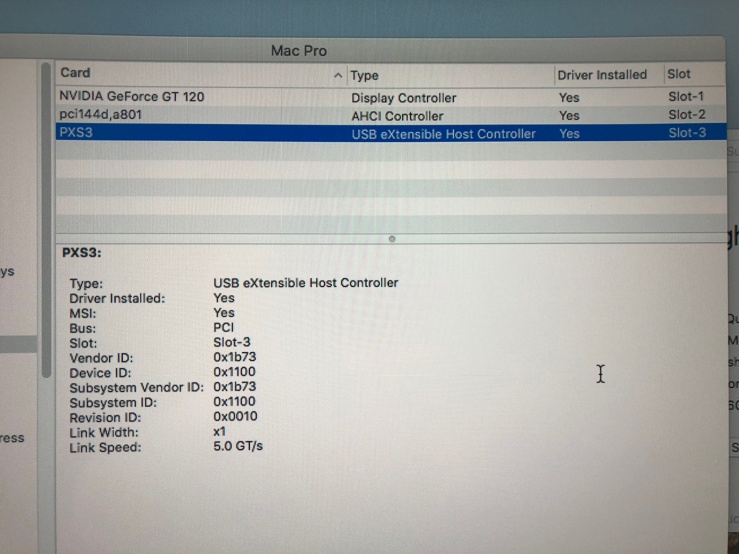
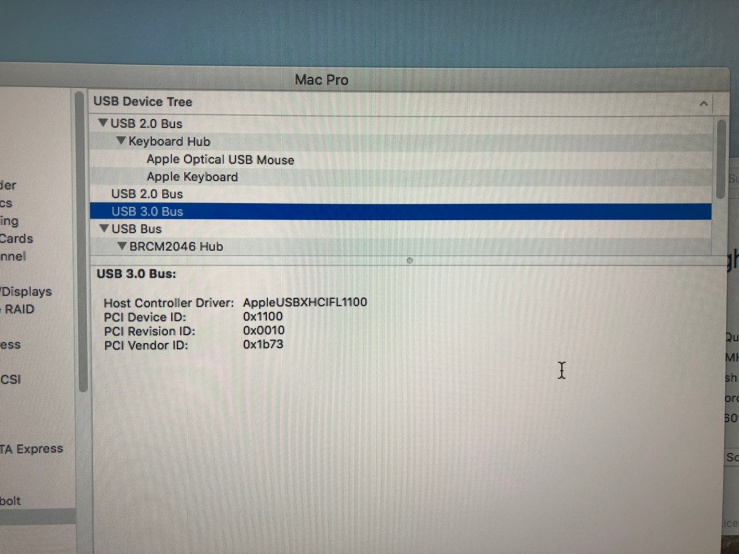
USB 3.0 Upgrade
Did a bit of research and I was trying to look for a cheap one that works without additional driver installation. Settled with this brand called “Debroglie”. I put this in pcie slot 3 (Pcie 2.0 x4) and it works right out of the box.
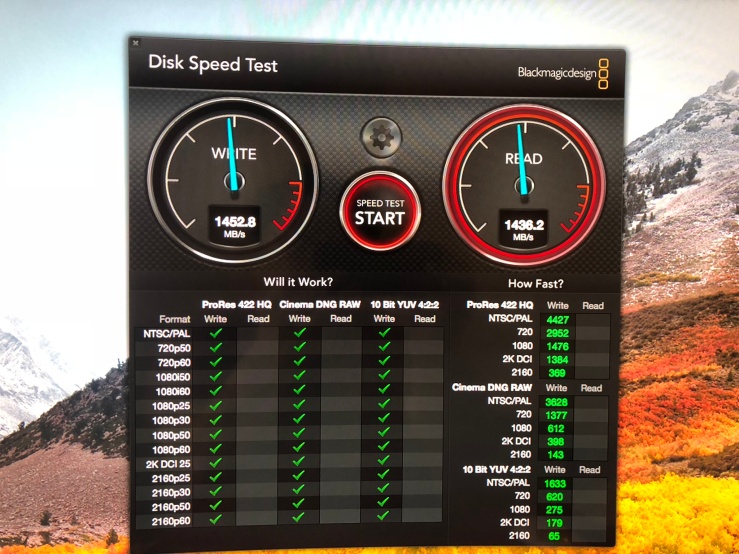
The SSD recognised right out of the box with no tinkering. I did the HDD transfer to the new SSD.
The speed seems to be satisfying. 1.4k read and write seems to be good enough for the work.
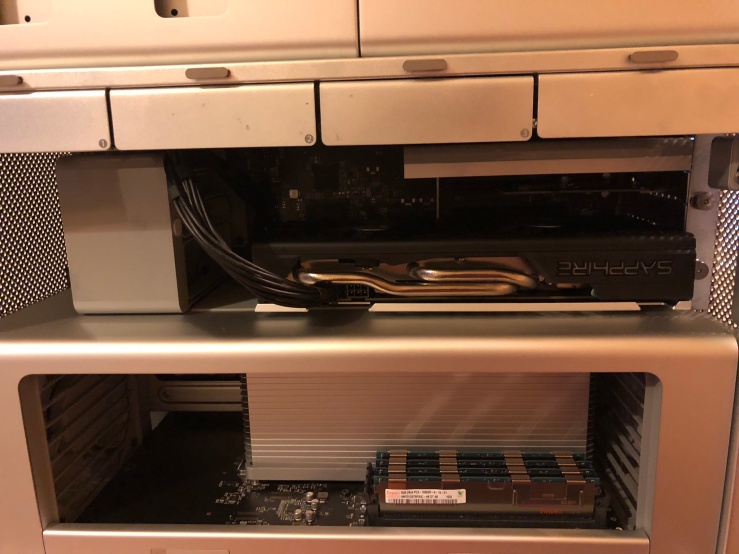
GPU Upgrade
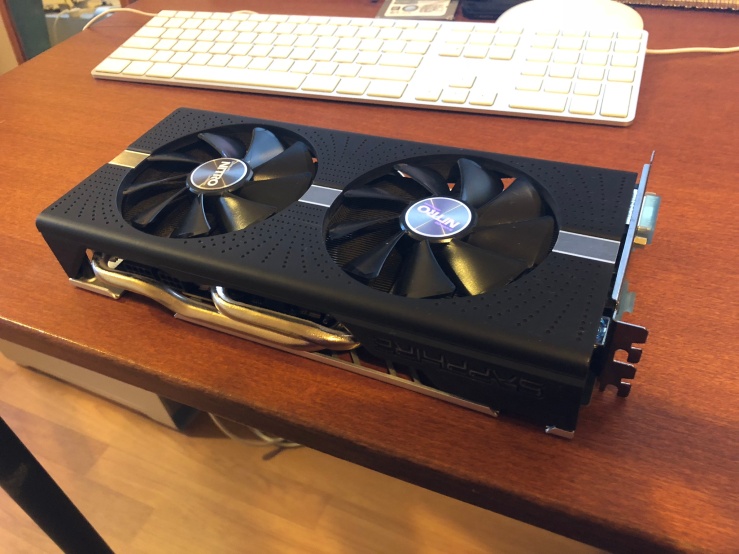
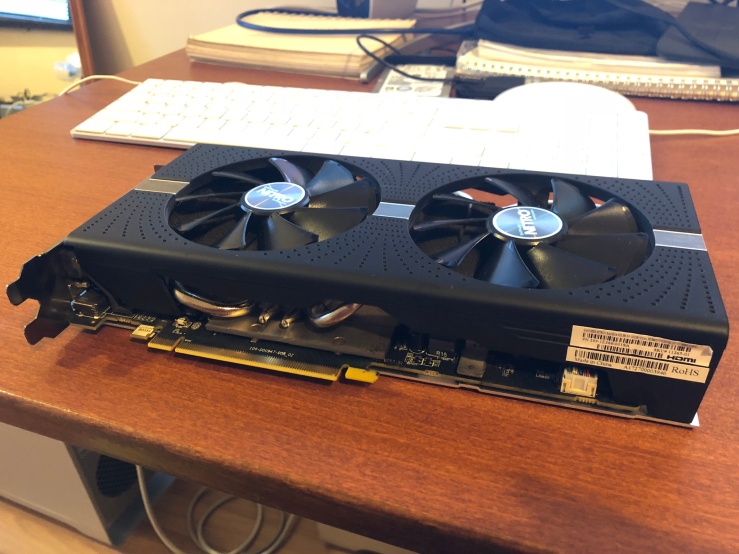
I have some AMD Rx580 8GB that I had for my other projects before. Can’t wait to swap out the crappy Nvidia GT120 card came with the system.
It’s a Sapphire Nitro+ RX580 8GB.
Still very new and lightly used.
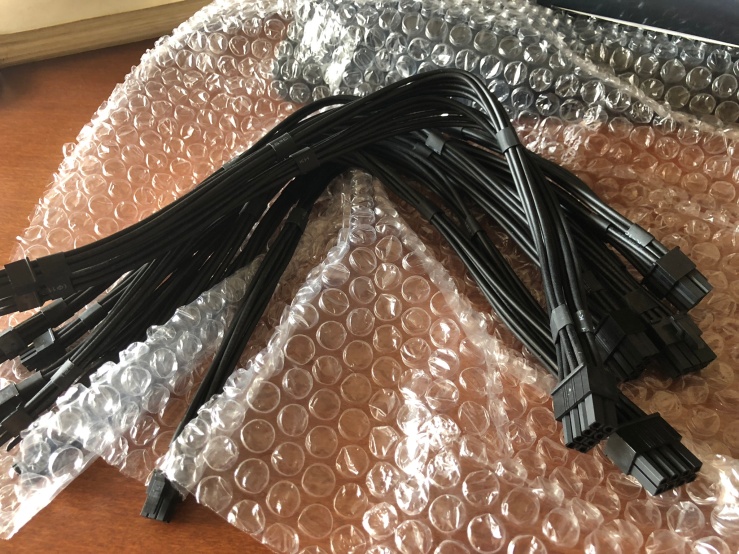
There are some mini 6 pin to 8 pins connector that I bought from Taobao. I notice that we can use 2 mini 6pin to 1 8pin connector or we can use 1 mini 6pin to 1 8pin and 1 mini 6 pin to 1 6pin connector. Either way works.
Putting it in was hard initially and then I notice that the easier way is to pull the grey fan back by pressing the small light grey button on the fan. This will open up a little on the holder to the GPU and allow us to easily slot in and out for the GPU.
vtudio has some very useful videos to show us on how to upgrade the system.
Final Result
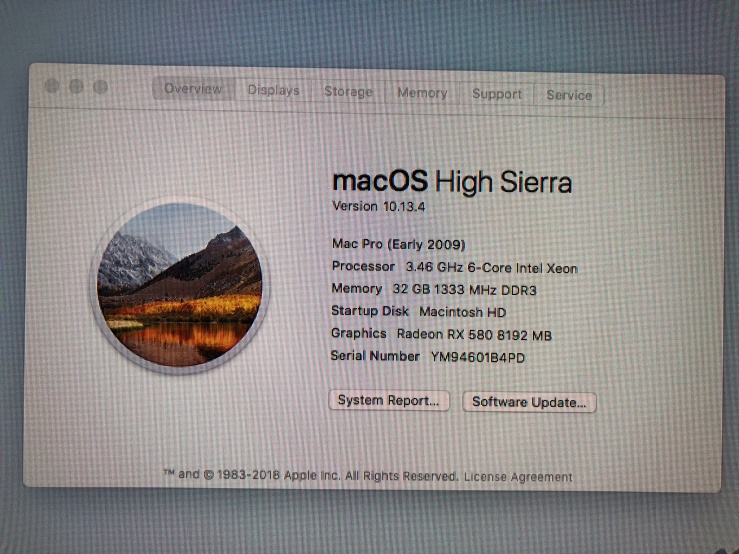
Finally after boot up we can see that the system has fully upgraded from 4 cores to 6 cores. The ram from 8GB 1066mhz to 32GB 1333mhz. However, I notice that the system actually runs better with 3 rams installed instead of 4 because its runs better on triple channel.
The RX580 recognised out of the box but it don’t comes with the EFI boot screen. I can’t be able to select start up disc by holding the alt button. This could be a problem if I wanted to switch OS or boot from USB or disc in future. Just make sure that you keep the original Nvidia GT120 card.
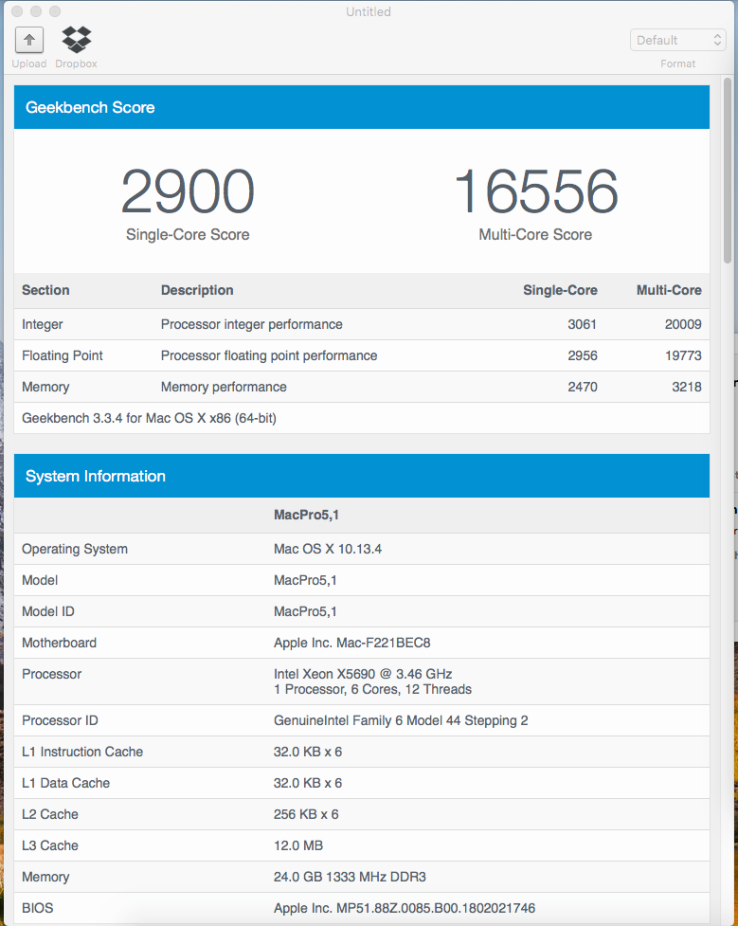
Here’s the Geekbench 4 64bit result. It’s quite similar in performance to the Alienware 17″ R3 I have. And it also very similar to the I5 8400 I have in office.
Before upgrade
After upgrade
Here’s the Geekbench 3 64bit result. Quite impressive for its age.
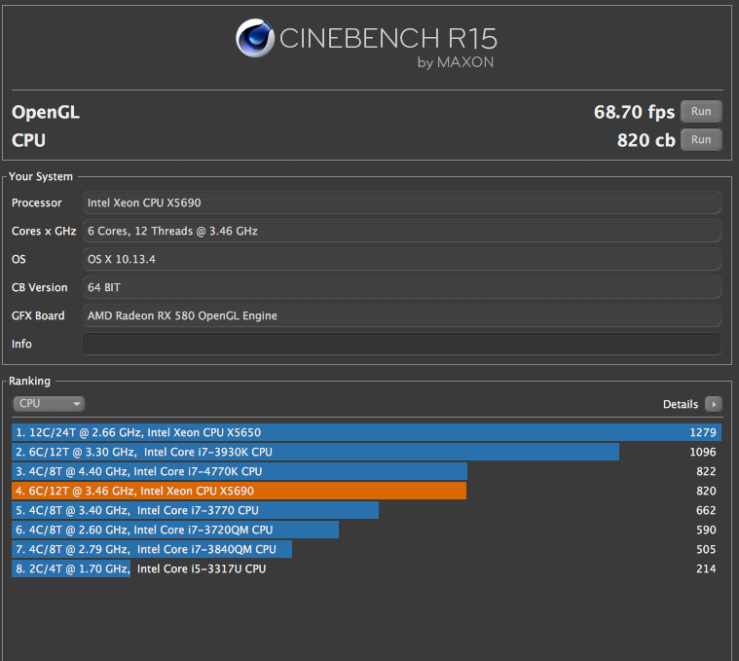
Cinebench also seems to be giving pretty good result.
Conclusion
Mac pro 4.1 RM 1,300
Graphics Card RX 580 8G RM 1,800
Xeon CPU x5690 RM 360
16GB ECC Ram RM 110 x 4 RM 440
500 GB SSD RM 725
Dual Sata 3 to PCIE expansion RM 125
USB 3 expansion RM 110
6+6+2 pins cables RM 12
Airport Extreme RM 22
Estimated Total RM 4,894 (Excluded Shipping)
Pricing wise, it’s definitely worth it. It cost less than the latest Macbook and it performs like the latest iMac. I believe this system can last for a good few years until I really going to let them go.
The whole process is quite enjoyable. I can conclude that the amount of works is very much worth the effort. I had a lot of fun of doing it.
Right after the first project, I’ve immediately called up my supplier and bought another 3 Mac Pro. I won’t stop here and I’m going to up my game next.